(MySQL) MySQL Replication을 통한 성능 개선
데이터베이스 Replication 이란?
데이터베이스 Replication이란 데이터베이스 별 권한을 두어 Master와 Slave로 관리하는 방식이다. Master에서는 쓰기 작업 만을 처리하며 Slave에서는 읽기 작업 만을 처리한다. 일반적인 애플리케이션 서비스는 DB의 70~80%가 읽기 요청이다. 그렇기 때문에 Replication을 통한 성능 향상을 기대할 수 있다. MySQL에서 어떠한 방식으로 Replication을 처리하며 구성하는 방식을 알아보자. 그리고 실제 프로젝트에 반영하여 확인하는 작업을 진행해보자.
MySQL Replication 동작 원리
MySQL 의 Replication 은 기본적으로 비동기 복제 방식을 사용하고 있다.
Master 노드에서 변경되는 데이터에 대한 이력을 로그에 기록하면, Replication Master Thread 가 (비동기적으로) 이를 읽어서 Slave 쪽으로 전송하는 방식이다.
MySQL 에서 Replication 을 위해 반드시 필요한 요소는 다음과 같다.
- Master 에서의 변경을 기록하기 위한 Binary Log
- Binary Log 를 읽어서 Slave 쪽으로 데이터를 전송하기 위한 Master Thread
- Slave 에서 데이터를 수신하여 Relay Log 에 기록하기 위한 I/O Thread
- Relay Log 를 읽어서 해당 데이터를 Slave 에 Apply(적용)하기 위한 SQL Thread
위의 구성 요소들은 아래 그림에서 보는 Flow 대로 데이터 복제를 수행한다.
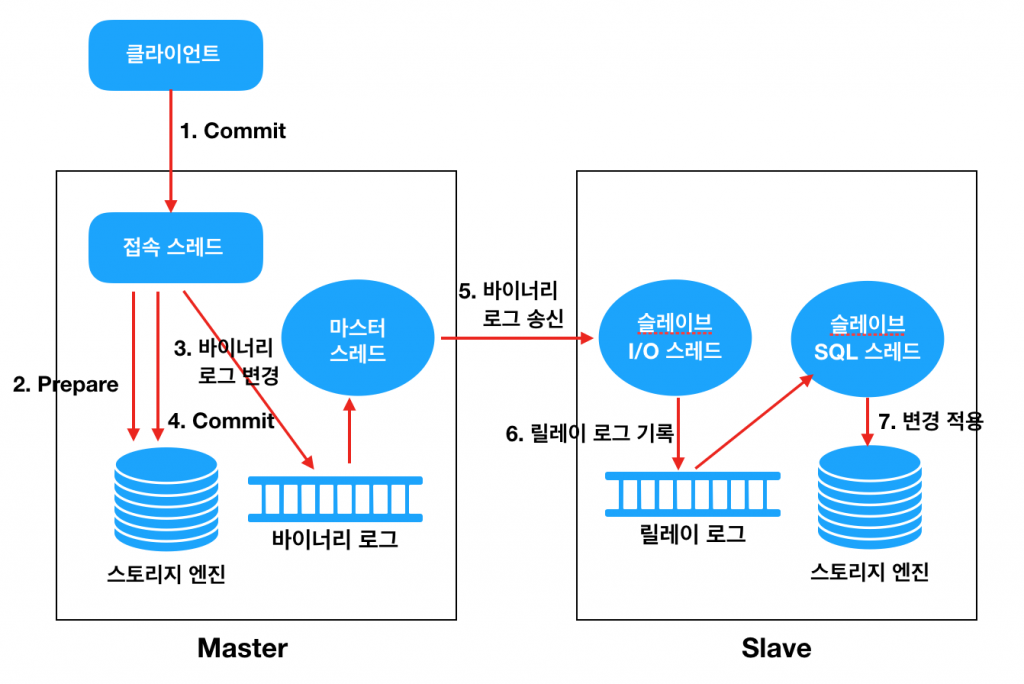
- 클라이언트(Application)에서 Commit 을 수행한다.
- Connection Thread 는 스토리지 엔진에게 해당 트랜잭션에 대한 Prepare(Commit 준비)를 수행한다.
- Commit 을 수행하기 전에 먼저 Binary Log 에 변경사항을 기록한다.
- 스토리지 엔진에게 트랜잭션 Commit 을 수행한다.
- Master Thread 는 시간에 구애받지 않고(비동기적으로) Binary Log 를 읽어서 Slave 로 전송한다.
- Slave 의 I/O Thread 는 Master 로부터 수신한 변경 데이터를 Relay Log 에 기록한다. (기록하는 방식은 Master 의 Binary Log 와 동일하다)
- Slave 의 SQL Thread 는 Relay Log 에 기록된 변경 데이터를 읽어서 스토리지 엔진에 적용한다.
MySQL Replication 구성
MySQL Replication을 구성해보자. 2대의 가상 서버 환경을 구축하고 MySQL을 설치하여 진행하겠다. 만약 master, slave의 데이터베이스가 동일하지 않다면 Replication을 구성하기 전 복원하여 동일하게 구성하도록 하자.
실습환경
1
2
Ubuntu 18.04
MySQL 5.7.42
1. master 서버 설정
아래 MySQL 설정 파일을 수정한다.
1
$ sudo vi /etc/mysql/mysql.conf.d/mysqld.cnf
1
2
3
4
5
6
7
8
[mysqld]
max_allowed_packet=1000M
server-id = 1
log-bin = mysql-bin
binlog_format = ROW
max_binlog_size = 500M
sync_binlog = 1
expire-logs-days = 7
- server-id : MySQL 서버 ID로, Master, Slave는 구별되어야 한다.
- log-bin : 바이너리 로그 파일 경로
- binlog_format : 바이너리 로그의 저장 형식을 지정한다.
STATEMENT,ROW,MIXED이 3가지 중 하나를 선택할 수 있다.
위와 같이 설정을 변경 후 restart 한다.
1
$ systemctl restart mysql.service
master의 status 정보를 조회하여 File, Position 정보를 확인한다.
1
SHOW MASTER STATUS \G
1
2
3
4
5
6
7
*************************** 1. row ***************************
             File: mysql-bin.000001
         Position: 627
     Binlog_Do_DB:
 Binlog_Ignore_DB:
Executed_Gtid_Set:
1 row in set (0.00 sec)
slave 서버의 계정 정보를 등록한다.
1
2
CREATE USER '{slave서버 유저ID}'@'{slave 서버 IP}' IDENTIFIED BY '{비밀번호}';
GRANT REPLICATION SLAVE ON *.* TO '{slave서버 유저ID}'@'{slave 서버 IP}';
2. slave 서버 설정
master와 마찬가지로 MySQL 설정 파일을 수정한다.
1
$ sudo vi /etc/mysql/mysql.conf.d/mysqld.cnf
1
2
3
4
5
6
7
8
[mysqld]
max_allowed_packet=1000M
server-id = 2
log-bin = mysql-bin
binlog_format = ROW
max_binlog_size = 500M
sync_binlog = 1
expire-logs-days = 7
위와 같이 설정을 변경 후 restart 한다.
1
$ systemctl restart mysql.service
Replication을 위해 MySQL에 접속하여 아래 sql을 실행한다. MASTER_LOG_POS는 master에서 조회한 position을 입력하고, MASTER_LOG_FILE는 file을 입력한다.
1
CHANGE MASTER TO MASTER_HOST="{master IP}", MASTER_PORT=3306, MASTER_USER="{master 사용자 ID}", MASTER_PASSWORD="{master 사용자 PW}", MASTER_LOG_FILE="mysql-bin.000001", MASTER_LOG_POS=627;
아래 명령을 입력하면 Replication이 시작되고 아래와 같은 상태를 확인할 수 있다.
1
START slave;
1
2
3
4
5
6
7
8
9
10
11
12
13
14
15
16
17
18
19
20
21
22
23
24
25
26
27
28
29
30
31
32
33
34
35
36
37
38
39
40
41
42
43
44
45
46
47
48
49
50
51
52
53
54
55
56
57
58
               Slave_IO_State: Waiting for master to send event
                  Master_Host: xxx.xxx.xxx.xxx
                  Master_User: sdc
                  Master_Port: 3306
                Connect_Retry: 60
              Master_Log_File: mysql-bin.000001
          Read_Master_Log_Pos: 7543
               Relay_Log_File: mysql-replication-slave-relay-bin.000004
                Relay_Log_Pos: 3916
        Relay_Master_Log_File: mysql-bin.000001
             Slave_IO_Running: Yes
            Slave_SQL_Running: Yes
              Replicate_Do_DB:
          Replicate_Ignore_DB:
           Replicate_Do_Table:
       Replicate_Ignore_Table:
      Replicate_Wild_Do_Table:
  Replicate_Wild_Ignore_Table:
                   Last_Errno: 0
                   Last_Error:
                 Skip_Counter: 0
          Exec_Master_Log_Pos: 7543
              Relay_Log_Space: 4582
              Until_Condition: None
               Until_Log_File:
                Until_Log_Pos: 0
           Master_SSL_Allowed: No
           Master_SSL_CA_File:
           Master_SSL_CA_Path:
              Master_SSL_Cert:
            Master_SSL_Cipher:
               Master_SSL_Key:
        Seconds_Behind_Master: 0
Master_SSL_Verify_Server_Cert: No
                Last_IO_Errno: 0
                Last_IO_Error:
               Last_SQL_Errno: 0
               Last_SQL_Error:
  Replicate_Ignore_Server_Ids:
             Master_Server_Id: 1
                  Master_UUID: 4f2178ec-0d40-11ef-8e74-f220cd68424f
             Master_Info_File: /var/lib/mysql/master.info
                    SQL_Delay: 0
          SQL_Remaining_Delay: NULL
      Slave_SQL_Running_State: Slave has read all relay log; waiting for more updates
           Master_Retry_Count: 86400
                  Master_Bind:
      Last_IO_Error_Timestamp:
     Last_SQL_Error_Timestamp:
               Master_SSL_Crl:
           Master_SSL_Crlpath:
           Retrieved_Gtid_Set:
            Executed_Gtid_Set:
                Auto_Position: 0
         Replicate_Rewrite_DB:
                 Channel_Name:
           Master_TLS_Version:
위 Replication 상태를 확인하고 싶다면 아래 sql을 실행하면 된다.
1
SHOW SLAVE STATUS \G;
이제 master의 데이터가 slave에 동기화 되는 것을 확인할 수 있다. Spring boot 프로젝트를 통해 @Transactional(readOnly = true) 일 경우 slave의 데이터를 조회, @Transactional일 경우 master에 CUD 하는 구성을 해보자.
SpringBoot 프로젝트 구성
구성환경
1
2
3
Spring boot 3.2.5
Zulu 17
JPA
의존성 추가
1
2
3
implementation 'org.springframework.boot:spring-boot-starter-data-jpa'
implementation 'org.springframework.boot:spring-boot-starter-web'
runtimeOnly `com.mysql:mysql-connector-j`
application.yml
기본 DataSource가 아닌 master, slave를 구별하여 설정한다.
1
2
3
4
5
6
7
8
9
10
11
12
13
14
15
16
17
18
19
20
21
22
23
24
spring:
  application:
    name: mysql-replication
  datasource:
    master:
      hikari:
        username: ${master 계정 ID}
        password: ${master 계정 pw}
        driver-class-name: com.mysql.cj.jdbc.Driver
        jdbc-url: jdbc:mysql://xxx.xxx.xxx.xxx:3306/replication
    slave:
      hikari:
        username: ${master 계정 ID}
        password: ${master 계정 pw}
        driver-class-name: com.mysql.cj.jdbc.Driver
        jdbc-url: jdbc:mysql://xxx.xxx.xxx.xxx:3306/replication
  jpa:
    hibernate:
      ddl-auto: update

    properties:
      hibernate:
        show_sql: true
        format_sql: true
DataSourceConfiguration 설정
1
2
3
4
5
6
7
8
9
10
11
12
13
14
15
16
17
18
19
20
21
22
23
24
25
26
27
28
29
30
31
32
33
34
35
36
37
38
39
40
41
42
@Configuration
public class DataSourceConfiguration {

   @Bean(DatabaseConsts.MASTER_SERVER)
   @ConfigurationProperties(prefix = "spring.datasource.master.hikari")
   public DataSource masterDataSource() {
      return DataSourceBuilder.create()
            .type(HikariDataSource.class)
            .build();
   }

   @Bean(DatabaseConsts.SLAVE_SERVER)
   @ConfigurationProperties(prefix = "spring.datasource.slave.hikari")
   public DataSource slaveDataSource() {
      return DataSourceBuilder.create()
            .type(HikariDataSource.class)
            .build();
   }

   @Bean
   public DataSource routingDataSource(
         @Qualifier(DatabaseConsts.MASTER_SERVER) DataSource masterDataSource,
         @Qualifier(DatabaseConsts.SLAVE_SERVER) DataSource slaveDataSource
   ) {
      RoutingDataSource routingDataSource = new RoutingDataSource();

      HashMap<Object, Object> dataSourceMap = new HashMap<>();
      dataSourceMap.put(DatabaseConsts.MASTER_SERVER, masterDataSource);
      dataSourceMap.put(DatabaseConsts.SLAVE_SERVER, slaveDataSource);

      routingDataSource.setTargetDataSources(dataSourceMap);
      routingDataSource.setDefaultTargetDataSource(masterDataSource);

      return routingDataSource;
   }

   @Bean
   @Primary
   public DataSource dataSource(@Qualifier("routingDataSource") DataSource routingDataSource) {
      DataSource determinedDataSource = routingDataSource(masterDataSource(), slaveDataSource());
      return new LazyConnectionDataSourceProxy(determinedDataSource);
   }
@ConfigurationProperties 을 사용해 application.yml에 설정 정보를 @Bean에 매핑한다. master, slave로 구분하여 DataSource를 등록한다.
routingDataSource에서 위 등록한 master, slave DataSource를 Map으로 등록하고 이를 @Bean으로 등록한다.
dataSource는 routingDataSource에 설정한 정보를 Spring boot 전반에 사용될 @Bean으로 등록한다.
Spring은 트랜잭션에 진입된 순간 바로 DataSource 를 가져오고, 커넥션을 획득한다. 그리고 그 다음에 트랜잭션의 현재 상태가 저장된다. 즉, TransactionSynchronizationManager에 트랜잭션 정보를 동기화 하는 작업은 DataSource로부터 Connection을 얻어온 이후 동작한다.
따라서 LazyConnectionDataSourceProxy 라는 클래스를 사용하여 트랜잭션에 진입한 시점이 아니라, 실제 쿼리가 시작된 시점에 DataSource 를 선택하도록 지연시킨다.
RoutingDataSource 설정
1
2
3
4
5
6
7
8
9
10
11
12
13
14
15
16
17
public class RoutingDataSource extends AbstractRoutingDataSource {
   @Override
   protected Object determineCurrentLookupKey() {
      boolean isReadOnly = TransactionSynchronizationManager.isCurrentTransactionReadOnly();

      System.out.println("Transaction의 Read Only가 " + isReadOnly + " 입니다.");

      if (isReadOnly) {
         System.out.println("Slave 서버로 요청합니다.");
         return DatabaseConsts.SLAVE_SERVER;
      }
      else {
         System.out.println("Master 서버로 요청합니다.");
         return DatabaseConsts.MASTER_SERVER;
      }
   }
}
AbstractRoutingDataSource 라는 추상 클래스를 통해 멀티 DataSource 환경을 묶고 분기할 수 있다.
AbstractRoutingDataSource 의 setTargetDataSources()라는 메소드를 통해 Map을 전달한다. 이때 Map의 Value로는DataSource를 전달한다. 전달된 DataSource 는 Map의 Key를 통해 찾을 수 있다. 여기서는 Key를 String 타입으로 사용할 것이다.
AbstractRoutingDataSource 를 상속받는 구체 클래스 RoutingDataSource 를 구현하고,determineCurrentLookupKey() 메소드를 오버라이드하여 트랜잭션의 readOnly 값에 따라 다른 DataSource Key를 반환하도록 한다.
결과
간단한 사용자 Entity를 구성하여 저장 조회하는 테스트를 진행한다.
Hibernate:
    insert
    into
        user
        (password, user_name)
    values
        (?, ?)
Transaction의 Read Only가 false 입니다.
Master 서버로 요청합니다.
Hibernate:
    select
        u1_0.user_id,
        u1_0.password,
        u1_0.user_name
    from
        user u1_0
    where
        u1_0.user_id=?
Transaction의 Read Only가 true 입니다.
Slave 서버로 요청합니다.
마치며
MySQL Replication 구현을 위한 MySQL 구성, Spring Boot 프로젝트 구성을 진행하였다. Replication 목적은 읽기 / 쓰기를 분리하여 애플리케이션의 성능 향상을 기대할 수 있다는 점이다. 하지만 Replication이 비동기로 진행되기에 시점에 따라 데이터의 부정합이 발생할 수 있다는 단점을 가지고 있다. 그렇기에 부정합이 발생하지 않아야 하는 애플리케이션이라면 이를 보완할 수 있는 대응 방안이 필요하다.
Github
https://github.com/inturn86/mysql-replication
참고자료
https://hudi.blog/database-replication-with-springboot-and-mysql/